CTF-ALL-In_One笔记
看到朋友圈学弟推荐他舍友写的一套CTF学习路线,作为一名"安全"从业人员,个人觉得还是有必要静下心来好好学习。本文只记录一些相对不太熟或理解不深刻的知识点,并尽量辅之以实例。
apropos 命令
apropos [whatever] 在一些特定的包含系统命令的简短描述的数据库文件里查找关键字
[root workspace]#apropos passwd
chgpasswd (8)        - update group passwords in batch mode
chpasswd (8)         - update passwords in batch mode
fgetpwent_r (3)      - get passwd file entry reentrantly
getpwent_r (3)       - get passwd file entry reentrantly
gpasswd (1)          - administer /etc/group and /etc/gshadow
grub-mkpasswd-pbkdf2 (1) - generate hashed password for GRUB
htpasswd (1)         - Manage user files for basic authentication
openssl-passwd (1ssl) - compute password hashes
pam_localuser (8)    - require users to be listed in /etc/passwd
passwd (1)           - change user password
passwd (1ssl)        - compute password hashes
passwd (5)           - the password file
passwd2des (3)       - RFS password encryption
update-passwd (8)    - safely update /etc/passwd, /etc/shadow and /etc/group
[root workspace]#
我们可以看到比较常见的命令passwd(1),以及C函数库调用fgetpwent_r,通过apropos命令可以按照关键字查找关联命令。
ctrl+z fg命令
ctrl+z命令是挂起当前进程,使用fg可唤醒
[root workspace]#sleep 100
^Z
[1]+  Stopped                 sleep 100
[root workspace]#
[root workspace]#jobs
[1]+  Stopped                 sleep 100
[root workspace]#
[root workspace]#fg 1
sleep 100
我们可以使用命令查看进程状态:
[root ~]#sleep 20
^Z
[1]+  Stopped                 sleep 20
[root ~]#
[root ~]#ps -aux | grep sleep
root      3735  0.0  0.0  14576   844 pts/0    T    11:00   0:00 sleep 20
root      3787  0.0  0.0  21536  1008 pts/0    S+   11:00   0:00 grep --color=auto sleep
ps aux显示进程常见状态:
R: running or runnable, it is just waiting for the CPU to process it
S: Interruptible sleep, waiting for an event to complete, such as input from the terminal
D: Uninterruptible sleep, processes that cannot be killed or interrupted with a signal, usually to make them go away you have to reboot or fix the issue
Z: Zombie, we discussed in a previous lesson that zombies are terminated processes that are waiting to have their statuses collected
T: Stopped, a process that has been suspended/stopped
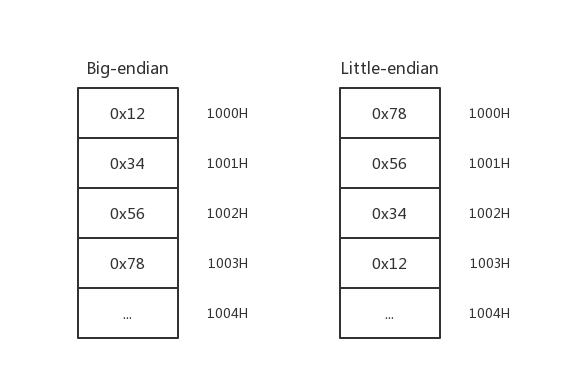
字节序
例如十六进制整数0x12345678存入以1000H开始的内存中:
使用gdb实际演示:
c代码如下:
#include <stdio.h>

int main()
{
    int n = 0x12345678;
    printf("0x%x\n",n);

    return 0;
}
(gdb) b main
Breakpoint 1 at 0x652: file endian.c, line 5.
(gdb) r
Starting program: /root/endian
Breakpoint 1, main () at endian.c:5
5 int n = 0x12345678;
(gdb) n
6 printf("0x%x\n",n);
(gdb) p &n
$1 = (int *) 0x7fffffffe41c
(gdb) x/4xb 0x7fffffffe41c
0x7fffffffe41c: 0x78 0x56 0x34 0x12
(gdb) show endian
The target endianness is set automatically (currently little endian)
一篇总结的非常到位的gdb调试中打印相关的文章:
动态链接与静态链接
针对如下源码:
#include <stdio.h>

int main()
{
    printf("Hello,world.\n");

    return 0;
}
[root gcc]#gcc hello.c -static
[root gcc]#
[root gcc]#
[root gcc]#ll -lt
total 840
-rwxr-xr-x 1 root root 844704 Nov 24 11:22 a.out*
drwxr-xr-x 2 root root   4096 Nov 24 11:22 ./
-rw-r--r-- 1 root root     80 Nov 24 11:12 hello.c
drwxr-xr-x 4 root root   4096 Nov 24 11:11 ../
[root gcc]#
[root gcc]#
[root gcc]#file a.out
a.out: ELF 64-bit LSB executable, x86-64, version 1 (GNU/Linux), statically linked, for GNU/Linux 3.2.0, BuildID[sha1]=0dca79912888b45d8b6e686be3d7ba708b66149e, not stripped
[root gcc]#gcc hello.c
[root gcc]#
[root gcc]#
[root gcc]#ll -lt
total 24
-rwxr-xr-x 1 root root 8304 Nov 24 11:24 a.out*
drwxr-xr-x 2 root root 4096 Nov 24 11:24 ./
-rw-r--r-- 1 root root 80 Nov 24 11:12 hello.c
drwxr-xr-x 4 root root 4096 Nov 24 11:11 ../
[root gcc]#
[root gcc]#file a.out
a.out: ELF 64-bit LSB shared object, x86-64, version 1 (SYSV), dynamically linked, interpreter /lib64/l, for GNU/Linux 3.2.0, BuildID[sha1]=ce09709a72d3d682cc4d6e68d6a16eb1b3f76c7e, not stripped
我们可以看到使用static之后可执行文件a.out文件体积较大,使用file命令可以看到文件信息为statically linked.如果不加static命令文件体积较小,使用file命令看到dynamically linked.
c语言printf
C示例代码:
#include <stdio.h>

int main()
{
    int n = 20;
    printf("%12c%n\n",'A',&n);
    printf("n = %d.\n",n);

    printf("%16s%n\n","Hello,world.Fine,thankyou,and you?",&n);
    printf("n = %d.\n",n);

    printf("%2$s %1$s\n","Format","Strings");

    return 0;
}
程序执行结果:
[root gcc]#./a.out
           A
n = 12.
Hello,world.Fine,thankyou,and you?
n = 34.
Strings Format
                                         �
[root gcc]#./a.out
           A
n = 12.
Hello,world.Fine,thankyou,and you?
n = 34.
Strings Format
                                         D
[root gcc]#./a.out
           A
n = 12.
Hello,world.Fine,thankyou,and you?
n = 34.
Strings Format

[root gcc]#./a.out
           A
n = 12.
Hello,world.Fine,thankyou,and you?
n = 34.
Strings Format
                                         T
[root gcc]#
程序运行结果解释:
n,不输出字符,但是把已经成功输出的字符个数写入对应的整型指针参数所指的变量。
n$,n是用这个格式说明符显示第几个参数;这使得参数可以输出多次,使用多个格式说明符,以不同的顺序输出。
最后一个例子,首先输出41个空格,然后输出n的低8位地址作为一个字符,由于每次运行n的地址不同,因此每次运行程序的输出不同。
linux通配符
rm file1 file2 file3 file4 file5 file6 file7 file8可以使用如下方法删除
rm -f file[1-8]
rm -f file*
通配符语法:?
问号与任何单个字符匹配。
通配符语法:[]
[]该通配符与?相似,但允许指定的更确切。
[Cc]hange[Ll]og 将与 Changelog、ChangeLog、changeLog 以及 changelog 匹配。您可以看
到,与大写形式的变形匹配时,使用括弧通配符很有用。
通配符语法:[!]
除了不与括弧中的任何字符匹配外,[!] 构造与 [] 构造类似,只要不是列在 [! 和 ] 之间的字符,
它将与任何字符匹配。例子:
rm myfile[!9] 将删除除 myfile9 之外的名为 myfile 加一个字符的所有文件。